Step 1Open a new file
size 500x500

We will start with making the petals which as we all know have different shapes and sizes
My flower will be "perfect" or maybe call it "mutant" since for the simplicity of this tutorial i am going to make them all equal
To make a petal are different ways,the one i chosed is to use the
Custom Shape Tool i have picked the rain-drop shape and distorted a bit

this is how it looked before

and this is how it looks after i have warped it
Edit>Transform>Warpin the small box i have chosed
Fisheye
 Step 2
Now that wee have the petal we should add some color to be more realistic
Double click on the layer and let's play with the layer styles
this looks much better right?.
 Step 3
Now that we have one petal we should duplicate it
Before that pay attention to one trick
Go to
Edit>Free TransformSee that little circle with four points? it represents the centre
Move it to the bottom


This is reference for the next step - don't save any edits! Try rotating the petal now, using one of the corner handles. Neat, huh? Now click your Move tool and don't apply changes.
Step 4Right click on your layer and duplicate it,use it how many times you want
Remember that each time you duplicated you add a new petal
Using the trick i have showed you above rotate them and put in position
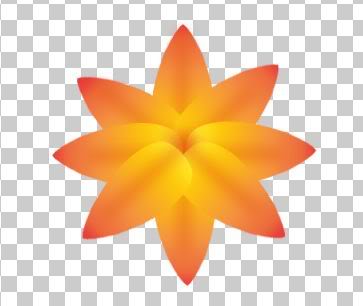
this is what i ended with

Now that we have rotated them the gradients have mixed up a bit

So we need to fix that
Go to Layer styles of each petal and adjust the angle of rotation until the dark color is outside of the flower

it will take some time but it worths
 Step 5
It's looking great already but we need to add some depth
make a new layer
Take the
Rectangle Tool and pick the drakest color form one of the two already used in the gradient
Pick one petal and draw a thin rectangle

After that go to Filter>Blur>Gaussian Blur and adjust the slider until you have a smooth shadow adding depth to your petal.

With this shadow, duplicate and rotate to place on each petal - use the same technique we used to rotate the petals themselves.
 Step 6
I think it's time to add receptacle to our flower
Make a new layer
Take the
Ellipse Tool U hold down
Shift key and draw a perfect circle
Go to layer styles> gradient overlay and pick a light yellow gradient,style radial

Reduced: 95% of original size [ 669 x 386 ] - Click to view full image

In theory that should be all but you can always add a lot of nice things to it
Have fun and don't forget to check the complete list of
How To Make Elements For Themes And Not Only Tutorials


